London Fog Ice Cream

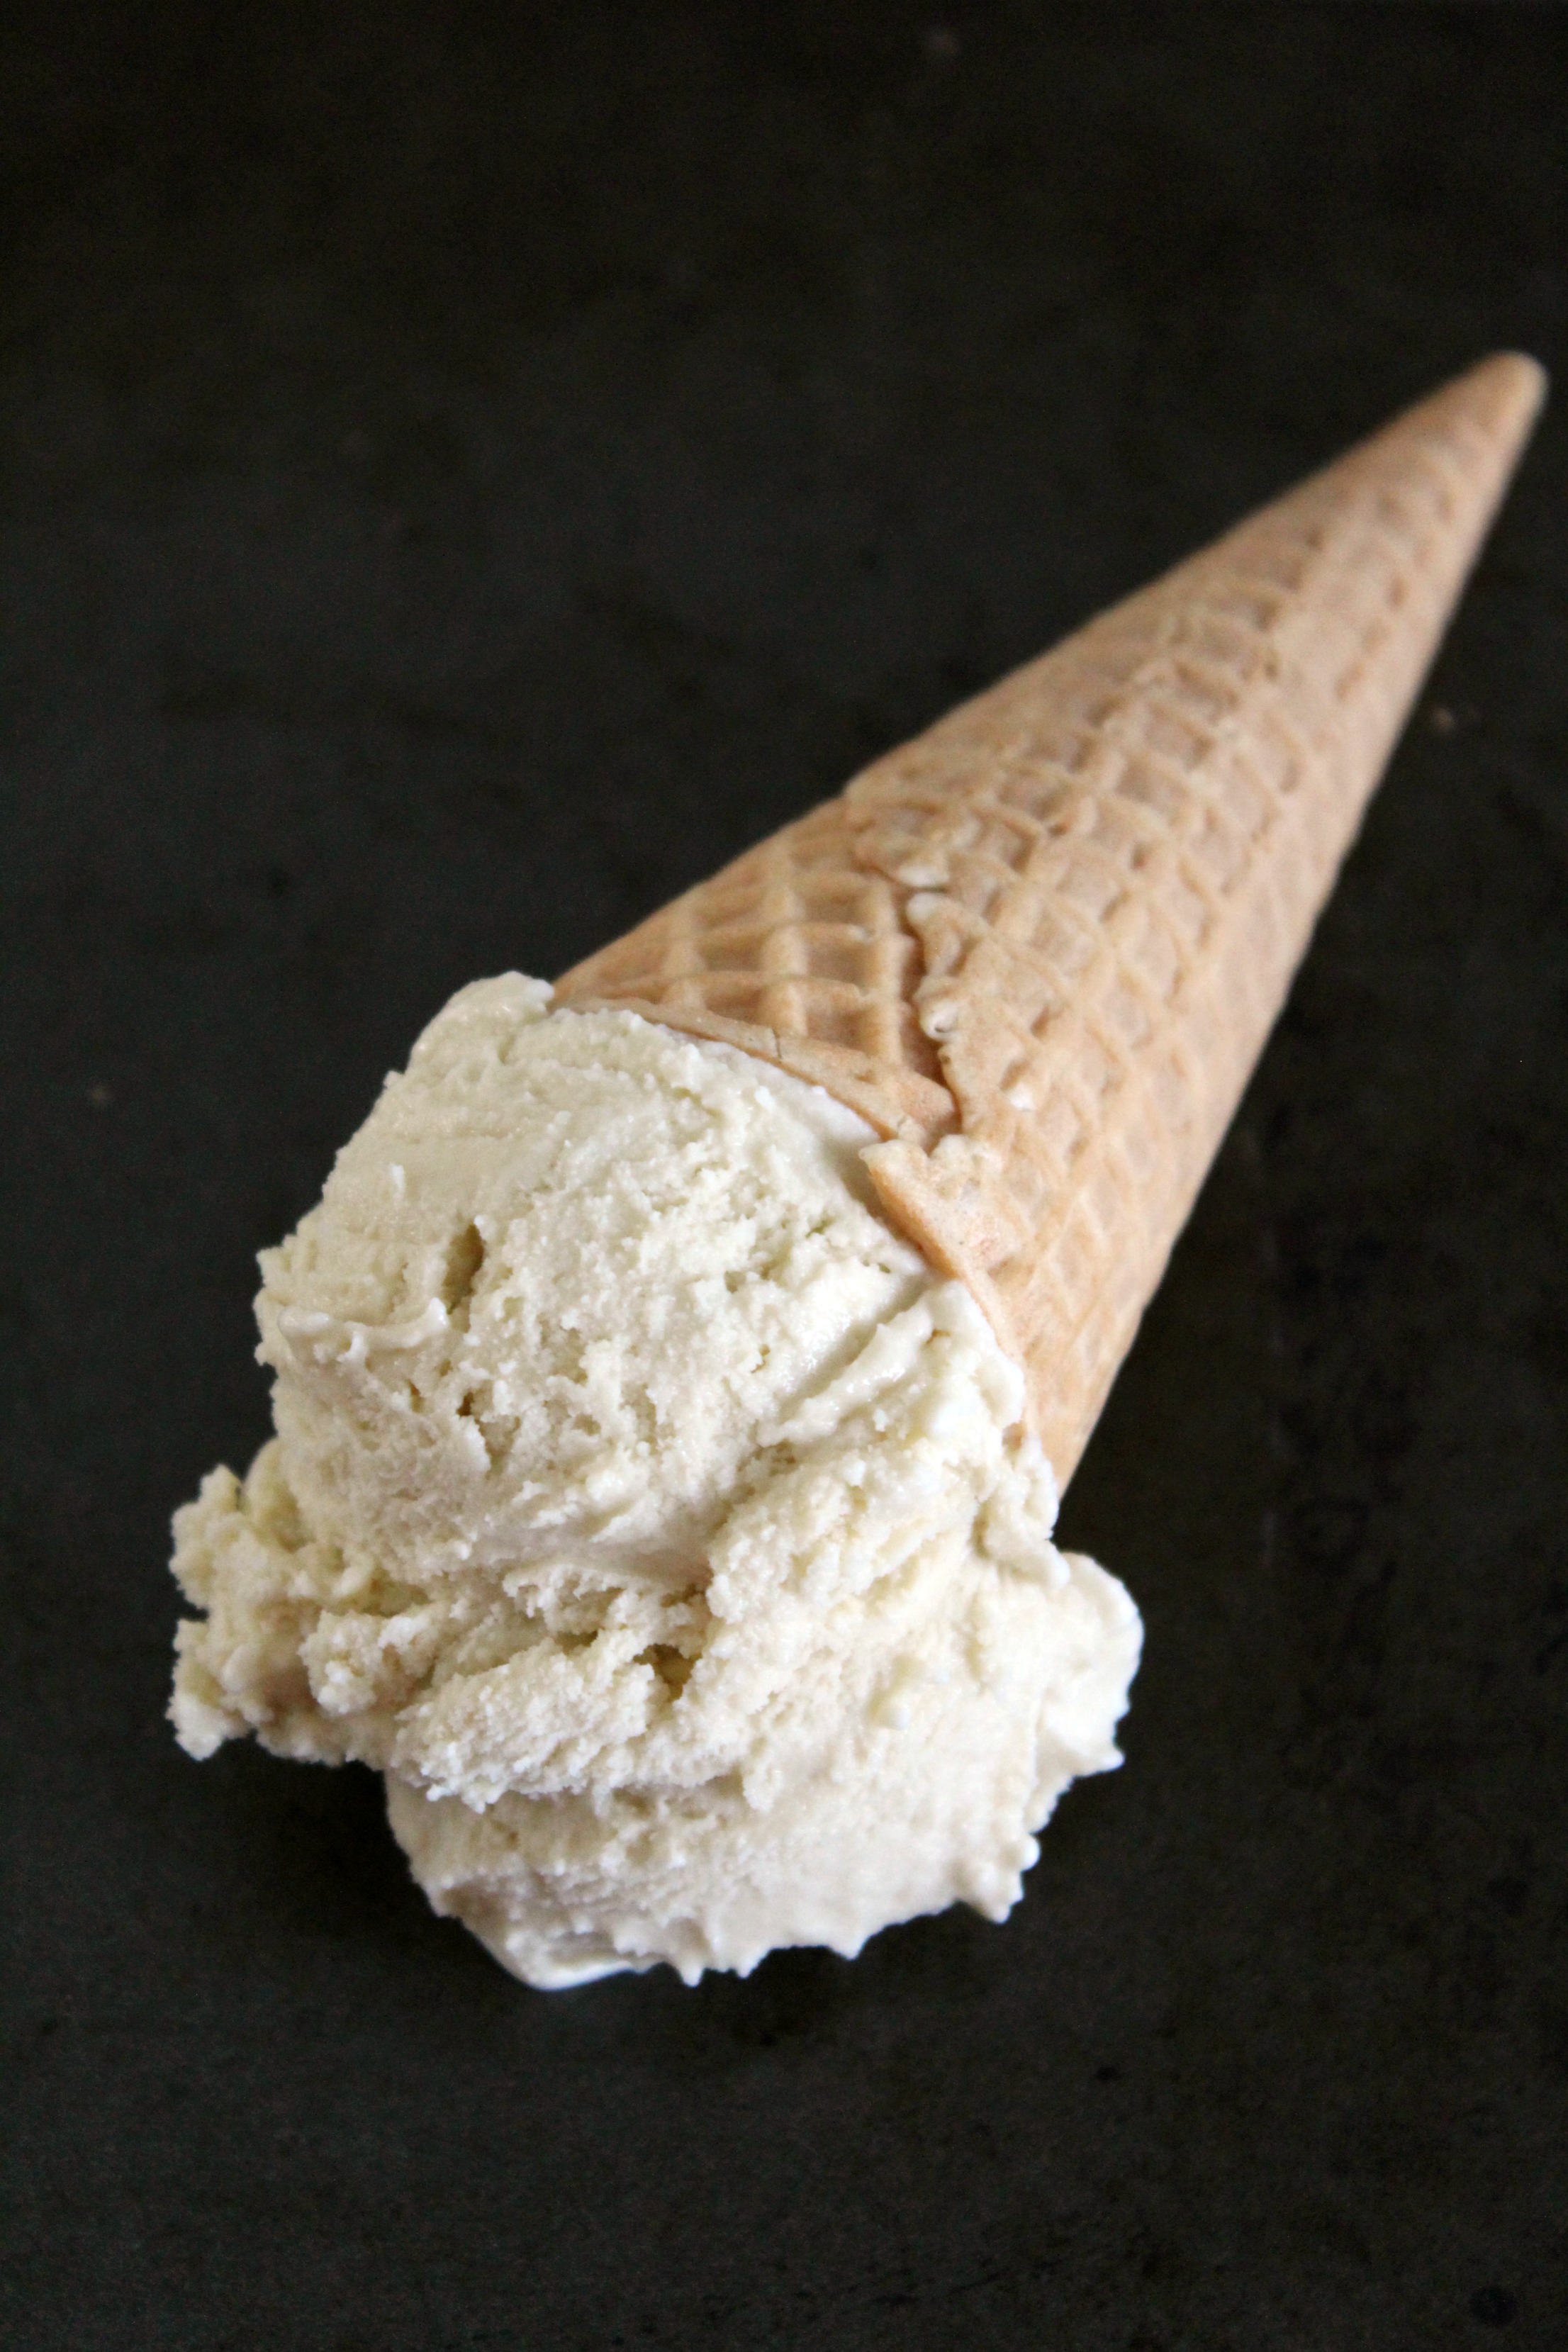
The Earl Grey tea with the hint of vanilla combined with the creaminess of the ice cream makes this London Fog ice cream hard to resist! 

London Fog Ice Cream - Earl Grey Ice Cream with a hint of vanilla 

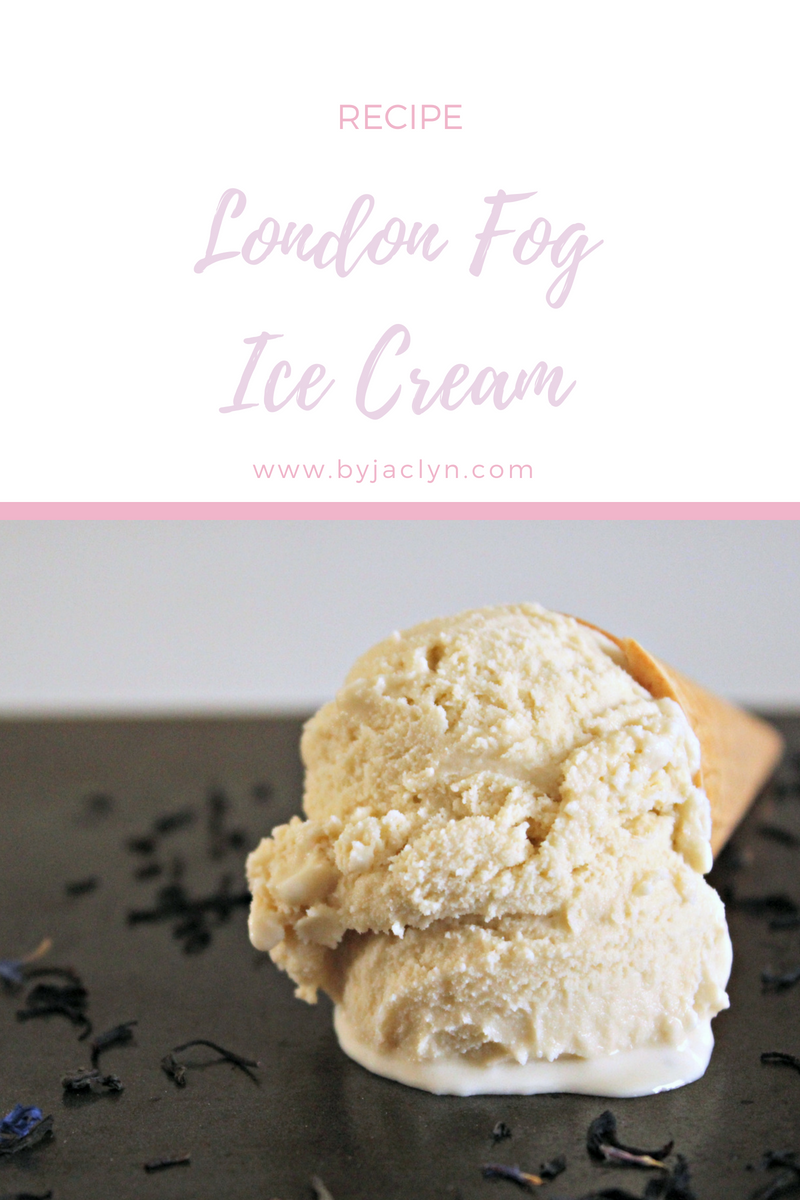
Anyone else excited for the Royal Wedding this weekend? Personally, I cannot wait to see Meghan's dress! I love her style, and she is becoming such a style icon. I'll bet her dress is fabulous and will have an impact on wedding fashion for years to come. In honour of the Royal Wedding,  I made this delicious London Fog ice cream. 

I am a tea person. My shelves are filled with various varieties. From oolongs to matcha, I love them all but I always start my day with a cup of earl grey. I love a London Fog latte. The hint of vanilla with the bergamot in the tea and the creaminess of the milk - delish! One of my favourite little ice cream shops in town makes the most delicious London Fog ice cream and with their made in house cinnamon waffle cones it is heavenly! As soon as I opened my ice cream maker for Christmas, I knew that I wanted to recreate their London Fog ice cream at home. 

Ice cream always takes way longer to make then I expect. I alway forget about the multiple cooling times required to chill the custard and the ice cream. The ice cream bowl for your ice cream maker also has to chill for 12-15 hours! So while the active time for making ice cream isn't much, there is a lot of waiting around and anticipation for the finished product. Let me assure you that its worth it! Since the ice cream bowl for the mixer has to chill overnight, I decided to cold steep my earl grey in the milk overnight to extract the most flavour from the tea. By cold steeping, the tea maintains its flavour and doesn't get bitter over time. The finished ice cream has just enough Earl Grey flavour that you can identify the type of ice cream you are eating but it's not overpowering and the light vanilla flavour comes through as well. 

London Fog Ice Cream - Earl Grey Tea with a hint of vanilla

London Fog Ice Cream

Note: Place your ice cream maker bowl in the freezer the night before you plan to make the ice cream. The ice cream custard requires 4 hours of cooling before churring and an additional four hours in the freezer after its been churrned.

Ingredients

  • 1 ½ c milk

  • 6 tbsp loose leaf earl grey tea

  • 4 large egg yolks

  • ⅔ c sugar

  • 1 tsp vanilla extract

  • 1 ½ c heavy cream

London Fog Ice Cream - Earl Grey Tea with a hint of Vanilla

Directions:

The night before place your ice cream maker bowl in the freezer to chill. Combine cold milk and earl grey tea leaves. Allow to steep in the fridge overnight. Strain tea leaves before use.

In a medium bowl, whisk together the egg yolks and sugar until pale. The mixture will be a bright yellow at first but should pale with mixing.

In a medium saucepan, over low to medium heat, heat the tea infused milk and vanilla until lightly simmering, remove from heat.  To temper the eggs, ladle about half of the milk mixture into the egg mixture. Whisking constantly to avoid scrambling the eggs. Slowly pour the tempered egg mixture into the saucepan with the remaining milk mixture. Return the mixture to the heat, and stir slowly but consistently until the mixture has thickened enough to coat the back of a spoon. Remove from heat. Stir in cream.  Chill the mixture in the fridge for at least 3 hours or up to overnight.

Once chilled completely, transfer to ice cream maker and churn ice cream according to the directions of your ice cream maker. It should take around 20 minutes to churn your ice cream and will be finished when the ice cream has a soft serve consistency. Once churned, transfer ice cream to a freezer container. Freeze until solid (approx. 4 hours).

 
London Fog Ice Cream - Earl Grey Tea with a hint of Vanilla

No-Churn Ice Cream: Nutella Peanut Butter Brownie Explosion

A rich and creamy no-churn vanilla ice cream swirled with Nutella, delicious fudgy brownies, and mini Reece's peanut cups.

No Churn Ice Cream: Nutella Peanut butter brownie explosion

Starbucks has already launched their pumpkin spice latte and here I am sharing a post about ice cream. I had every intention of having a "Back to School" themed baked good all ready for you but then I made this no-churn ice cream.  Maybe it was some desperate attempt to hold onto summer for just a little bit longer or maybe its that I just really love ice cream. Either way today you are getting a recipe for No-Churn Nutella Peanut Butter Brownie Ice Cream. Seriously longest name ever. If someone could come up with some cutesy name for this flavour that would be awesome! I was debating going with Nutty Brownie Explosion but I felt like that promised actual nuts in the ice cream. So I stuck with the long, boring yet informative name. 

I have wanted to make ice cream for so long but I have yet to invest in an ice cream maker. I was so excited when no-churn ice cream started popping up all over various websites and blogs. I knew I wanted to jump on the trend. There are so many different flavour possibilities! I decided to go with one of my favourite ice cream combinations. It is my usual order whenever we go to Marble Slab, an ice cream place where you can mix in any ice cream topping you want. I always add Reese's Peanut Butter cups and Nutella because I love Nutella and Peanut Butter together.  The brownies add another layer of chocolate flavour, and a delicious texture element to the ice cream. 

For this ice cream I used my one bowl brownies.  They are quick and easy to whip up, plus you will have some extras left over to enjoy on their own. That being said you can use any brownie you'd like in the ice cream. Store bough brownies, like those 2-Bite brownies would work well in this recipe. Rather than swirl all of my different mixings into the ice cream, I piled half on top. I really love the look it gave the ice cream in the loaf pan.

No Churn Nutella Peanut Butter Brownie Explosion Ice Cream

No-Churn Ice Cream: Nutella Peanut Butter Brownie Explosion!

Ingredients

2 c Heavy Whipping Cream, Cold

1 10oz can Condensed Milk 

2 tsp Vanilla Extract 

1/4 tsp salt 

1/4 c Nutella

1.5 c Brownies, chopped 

1 c Mini Reese's Cups

Directions 

Place a metal loaf pan in the freezer to chill for a few hours prior to making your ice cream. Place the bowl of your stand mixer and whisk in the fridge to chill as well, if desired. 

In a medium bowl, mix together condensed milk, vanilla and salt, set aside.  In the bowl of your stand mixer fitted with the whisk attachment over medium to high speed whisk heavy cream until stiff peaks form, about 3 minutes. 

Using a spatula, fold one cup of whipped cream into the condensed milk mixture to lighten it. Fold the mixture into the rest of the whipped cream until combined. Pour mixture into chilled metal loaf pan. Freeze for an hour and a half to 2 hours. Mixture should be thick and creamy, with a soft serve consistency. At this point stir in Nutella, half the brownies and mini Reese’s cups. Top the ice cream with the remaining brownies and mini Reese’s cups. Return ice cream to freezer and freeze for an additional 3 hours before serving. Ice cream should be solid and scoop-able. Store ice cream in freezer.


No Churn Ice Cream: Nutella Peanut butter brownie explosion