Buttercream Rosette Cake Tutorial

A quick and simple cake decorating tutorial to learn how to make a buttercream rosette cake using just a Wilton 1B decorating tip! 

Learn how to make a buttercream rosette cake using just a Wilton 1B decorating tip!

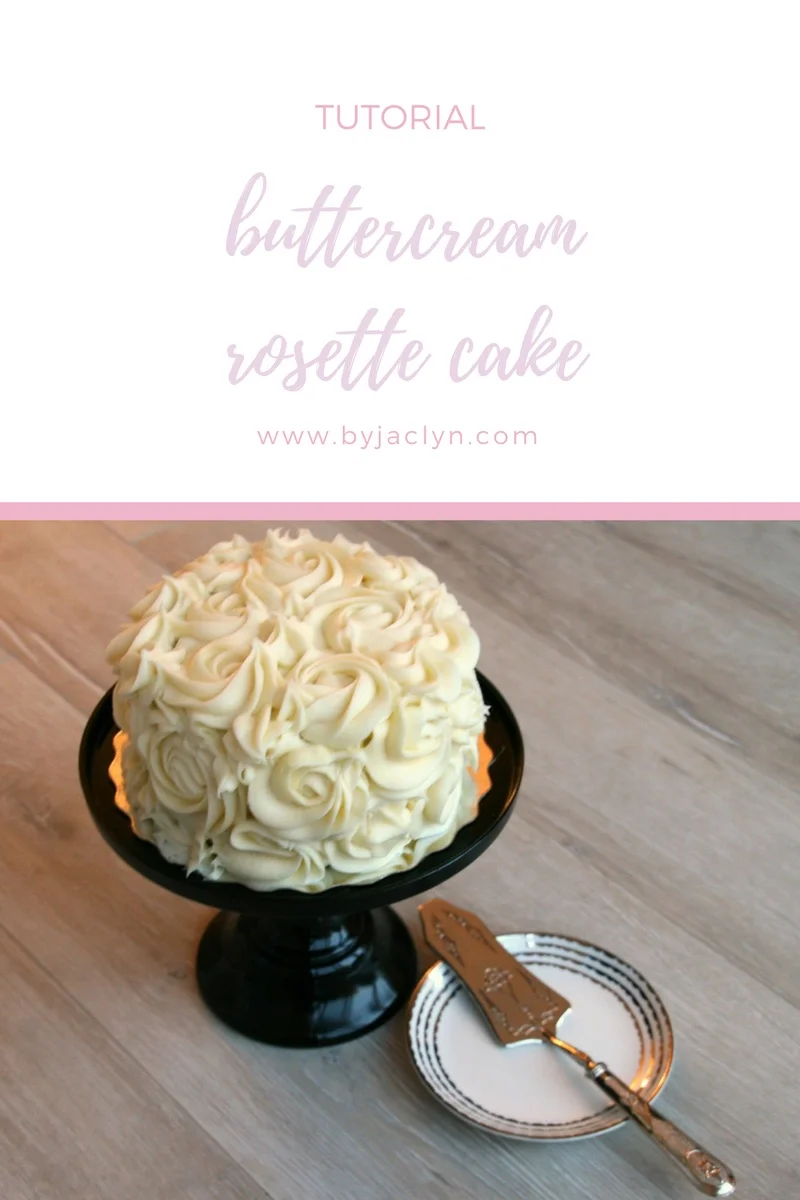
I have made this rosette cake more times that I can count. It is my go-to decorating technique when I need an elegant yet striking cake design. It looks beautiful on it's own or incorporated into a tiered cake design - like this wedding cake I made for my cousin.  I love that it only uses one decorating tip! This decorating technique is quick, simple and perfect for beginners. 

Tips for making a buttercream Rosette Cake

  • Make sure you have enough icing - these roses use up a lot. For an 8 inch cake - filled, crumb coated and covered in roses you will need 2-3 batches of this buttercream

  • Always ice a cold cake. If you try to ice a cake that is still warm from the oven the icing will just melt right off the cake

  • Add a good crumb coat to your cake before pipping your rosettes. This will lock in any crumbs and create a good base layer of colour for your cake - this is especially important if you are icing a dark cake (like chocolate) with a light colour frosting

  • Chill your cake in between adding the crumb coat and adding the rosettes. This will allow your crumb coat to set up

  • I prefer the look of a taller cake when decorating with rosettes. Go 3 or 4 layers high - trust me :)

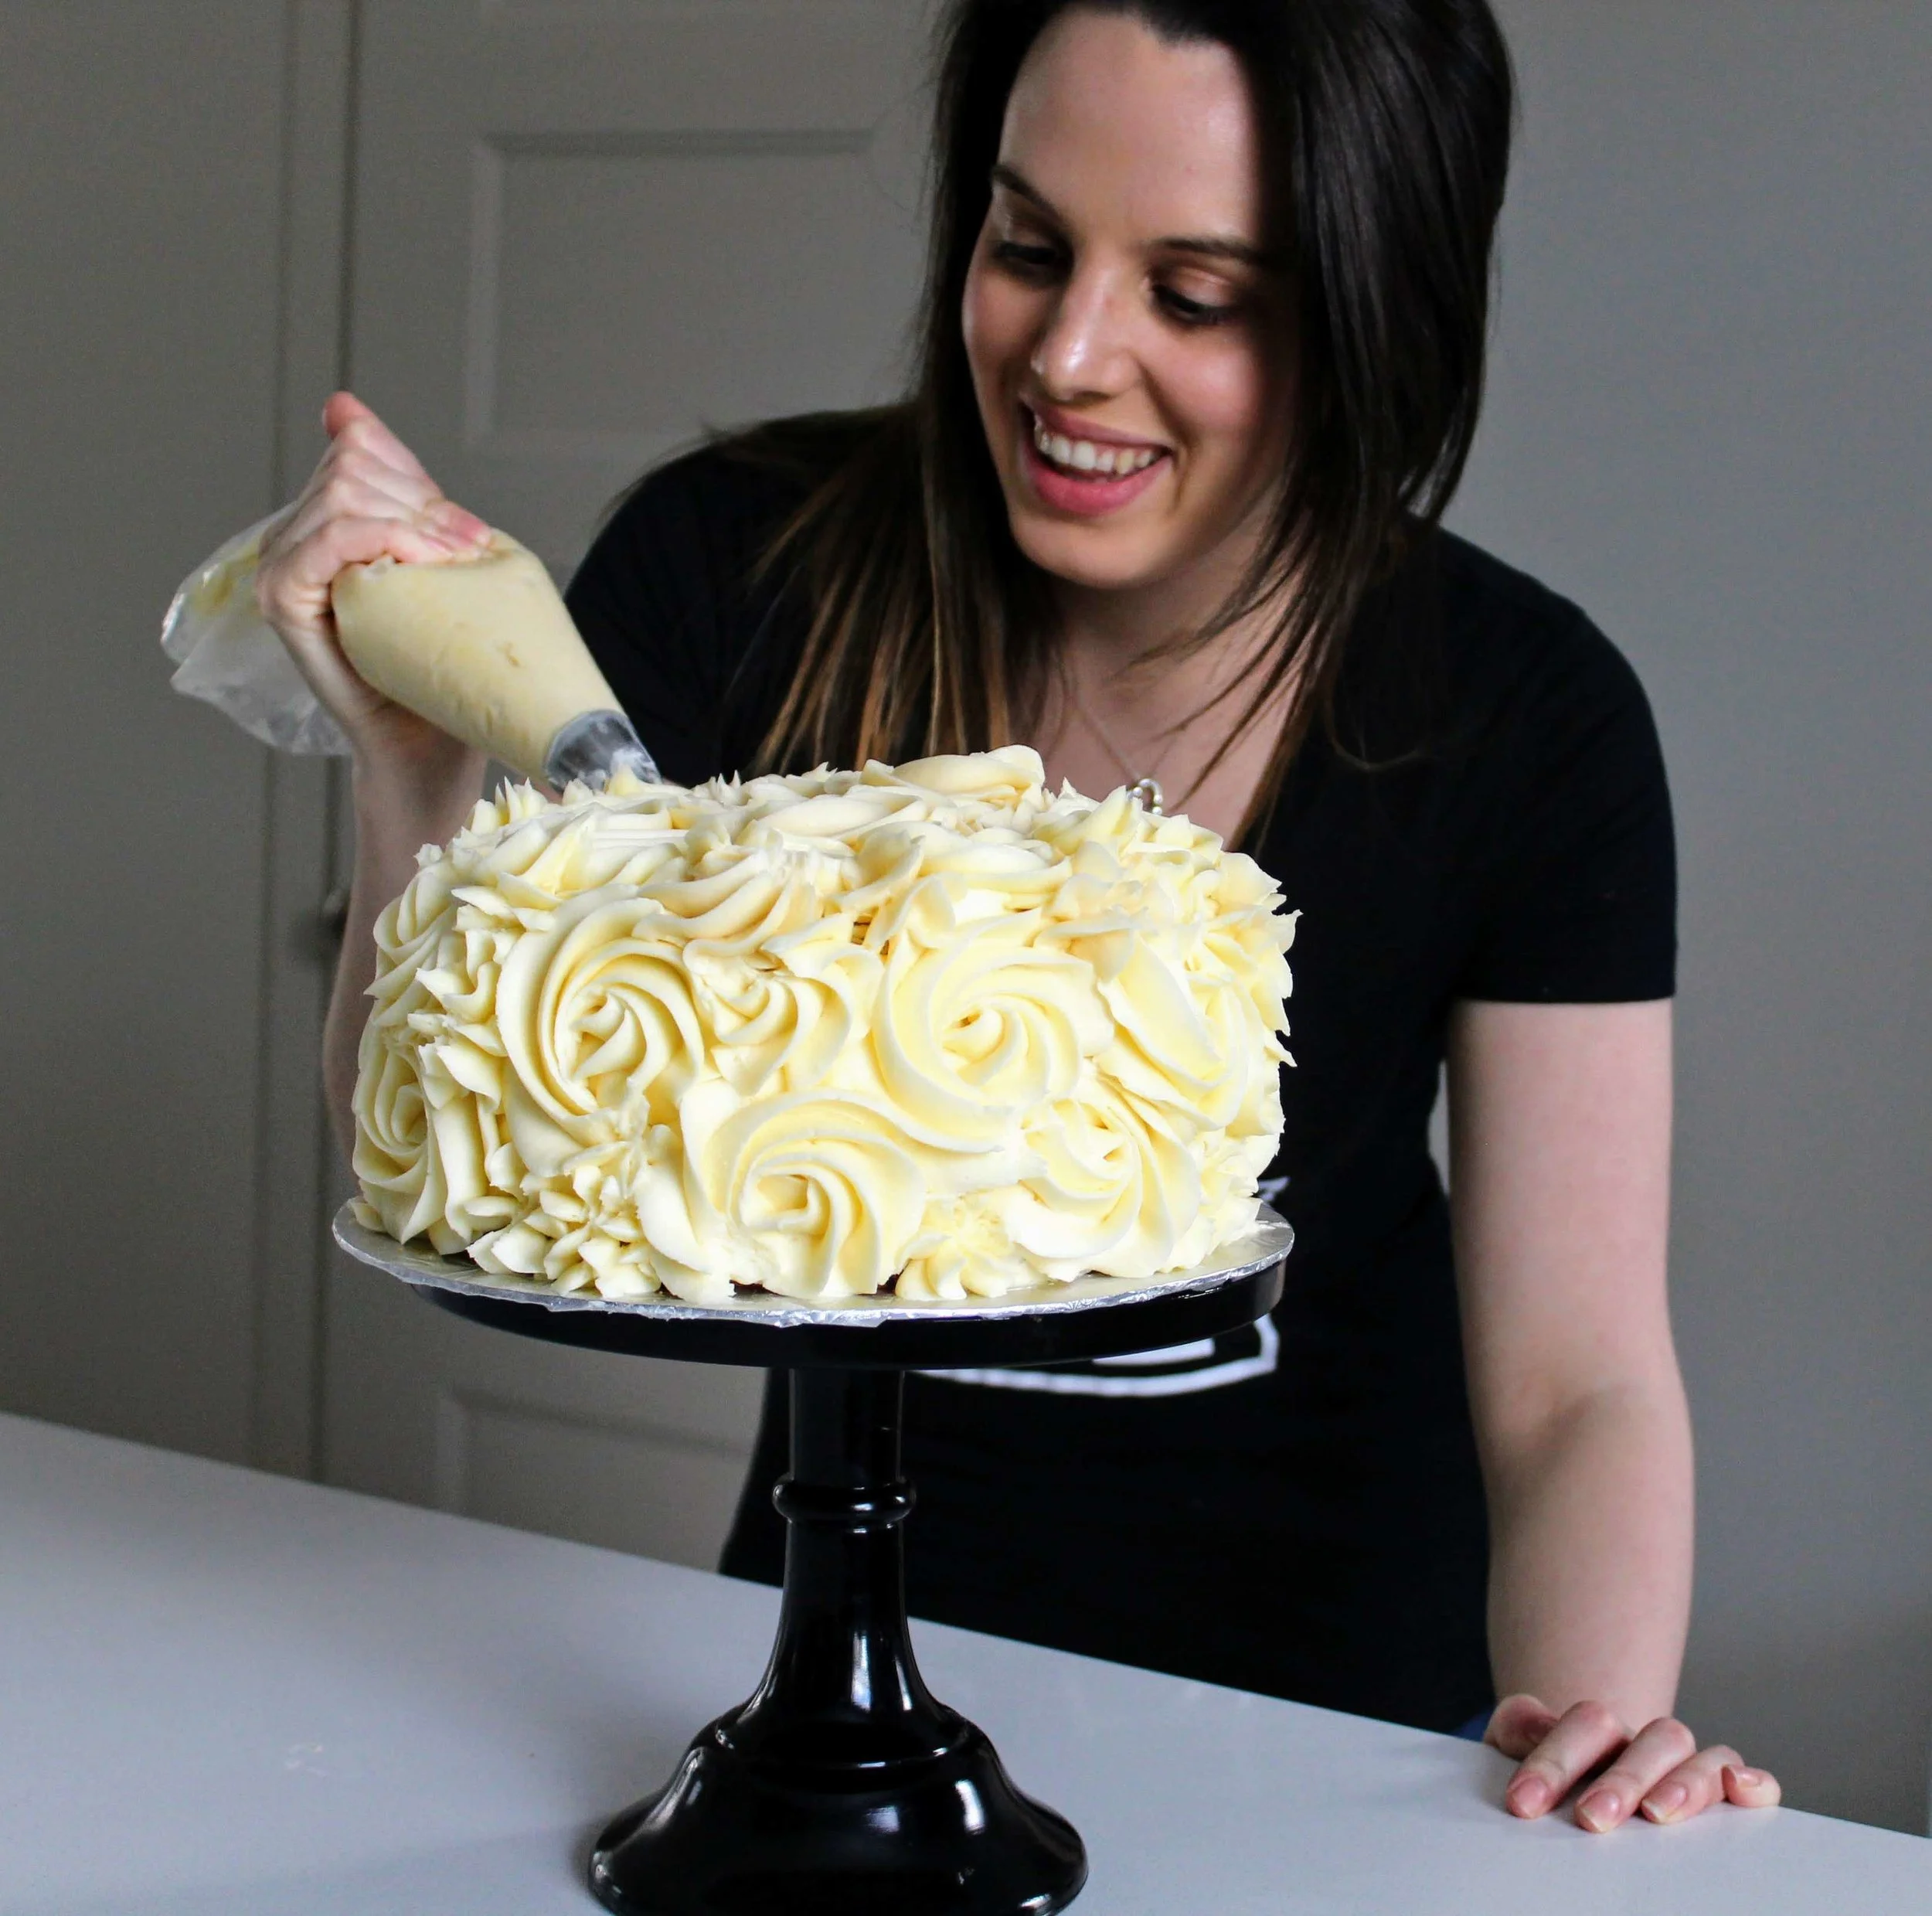
  • Create rosettes around the sides of your cake first. Start your rosettes at the bottom of your cake and work your way up to the top

  • When you get near the end of the frosting in your pipping bag, make sure it has enough to complete a rose. It is harder to create the rosettes with a near empty bag (as you can see from my video below - I didn't always take my own advice...)

  • Add swoops or stars to fill in any gaps between roses

How to pipe a rosette? 

Start in what you want to be the centre of the rosette, and using even pressure slowly create a circle (or swirl) around the centre of the rose in a counter-clockwise direction.

What tip to use for a rosette cake? 

Any large star tip will work for creating a rosette cake. My preference is for the Wilton 1B decorating tip. I have seen other beautiful rosette cakes using the Wilton 1M and 2D tips as well. 


Learn how to make a buttercream rosette cake using just a Wilton 1B decorating tip!

Rosette Buttercream Cake Tutorial


You'll Need 

A 6 or 8 inch cake

Buttercream frosting (2-3 batches)

Pipping bag & tip (1B, 2D or 1M)

Offset spatula

Directions

Start with a 6 or 8 inch layered cake. Using your offset spatual, apply a crumb coat, using the same colour of frosting that you will be making your rosettes out of. It doesn't have to be neat, but it should cover the cake enough to keep all of the crumbs in and so the cake doesn't show through in between any gaps of the rosettes.

Place your decorating tip inside of your pipping bag and fill with your buttercream frosting. Start piping your rosettes on the sides of your cake first, working your way to the top and finishing the with top of your cake. To pipe a rosette: start in what you want to be the centre of the rosette, and using even pressure slowly create a circle (or swirl) around the centre of the rose in a counter-clockwise direction. Fill in any gaps between your rosettes with stars or swirls. 


Learn how to make a buttercream rosette cake using just a Wilton 1B decorating tip!

Chocolate Covered Strawberry Cupcakes

A decadent, moist chocolate cupcake frosted with a luscious fresh strawberry buttercream and topped with a succulent chocolate covered strawberry! Perfect for Valentine's Day!

Chocolate Cupcakes with Fresh Strawberry Buttercream topped with a Chocolate Covered Strawberry

It only seemed appropriate to kick off February with these chocolate covered strawberry cupcakes! I am so excited for all things Valentine's Day! Give me all the pink, chocolate and sappy rom-coms! Is there anything more quintessentially Valentine's Day than chocolate covered strawberries? I knew that I wanted to take this Valentine's Day classic and turn it into a cupcake. The fresh strawberry buttercream is seriously delicious! The strawberry puree not only adds flavour to the buttercream but also turns it a beautiful soft pink colour. I went with my Classic Chocolate Cupcake recipe for the base - why mess with a good thing? And topped the cupcakes with their very own chocolate covered strawberry - can you tell I am huge fan of two desserts in one?Whether its your BFF, sweetheart or child, your valentine is sure to love these cupcakes!  

Tips for Achieving the Perfect Chocolate Covered Strawberries

  • When melting your chocolate for your berries, I would recommend melting it in the microwave on medium heat for 20-30 second increments. Between each increment, remove the chocolate from the microwave and stir, repeat this until the chocolate is completely melted.

  • It is important to make sure that your strawberries are completely dry and free of any water or excess moisture. If there are any water droplets on the berries it will cause the chocolate to seize up.

  • Place your chocolate in a deep bowl or small cup to use when dipping your chocolate. Hold your berry by the stem and dip one side of the strawberry, followed by the other.

  • Place your freshly dipped strawberry on wax paper to set up.

Chocolate Cupcakes with Fresh Strawberry Buttercream topped with a Chocolate Covered Strawberry

Chocolate Covered Strawberry Cupcakes

with a fresh strawberry buttercream

Makes: 1 dozen cupcakes

Ingredients

For the cupcakes

1/4 c hot water 

1/4 c cocoa powder 

1/2 tsp instant coffee 

1 c flour 

1/2 tsp baking powder 

1/2 tsp baking soda 

1/2 tsp salt 

1/2 c butter, cut into cubes

1 c sugar 

2 eggs, at room temperature 

2 tsp vanilla 

1/2 c sour cream 

For the Frosting

1 c butter, at room temperature

3 c icing sugar 

1/2 c strawberry puree*

For the Chocolate Covered Strawberries

12 -15 Strawberries 

1 c semi sweet chocolate chips, melted

Directions

For the Cupcakes

Preheat oven to 350F. Line a cupcake pan with liners. In a small bowl, whisk together hot water, cocoa powder and instant coffee. In another medium bowl, sift together flour, baking soda, baking powder and salt. 

In a small sauce pan, over medium heat combine the butter and sugar. Stir occasionally, until the sugar is dissolved and the butter is melted. Remove from heat and pour into bowl of stand mixer fitted with paddle attachment. On medium, beat butter & sugar mixture until it begins to thicken and pales in colour (approx. 4-5 mins). You want to ensure the mixture has cooled slightly before adding your eggs. Add eggs one at a time, scrapping down the sides of the bowl after each addition. Add in vanilla and cocoa mixture. Mix until incorporated.  With the mixer on low speed, add half the flour, followed by the sour cream, ending with the rest of the flour mixture. Mix until just incorporated.

Divide batter evenly into prepared cupcake liners. Fill liners 1/2-2/3rds of the way full.  Bake for 18-20 minutes, or until a toothpick inserted into the centre comes out clean. Let cool in pan for 5-10 minutes before transferring to a wire rack to cool completely.

For the Frosting

In the bowl of a stand mixer, fitted with a paddle attachment, on medium speed beat the butter until light and fluffy. Beat in icing sugar until light and fluffy. Finally, beat in strawberry puree until just combined.

*To make the strawberry puree, blend fresh strawberries using either an immersion blender or regular blender until smooth. 

For the Chocolate Covered Strawberries

Dip strawberries in melted chocolate and let set on parchment paper

Assemble the cupcakes

Frost cupcakes as desired. Top with chocolate covered strawberry before serving. Assembled cupcakes keep for up to 3 days in the fridge but are best served fresh.

 
Chocolate Cupcakes with Fresh Strawberry Buttercream topped with a Chocolate Covered Strawberry

Pina Colada Cupcakes

These Pina Colada cupcakes are perfect for summer and will make you feel like you are on a tropical getaway! 

Coconut flavoured pina colada cupcakes filled with pineapple puree and topped with a rum buttercream

If you like Pina Coladas and getting caught in the rain, then these cupcakes are for you.  These coconut cupcakes are filled with a pineapple puree and topped with a silky rum buttercream. A cherry on top and a cocktail umbrella complete these festive cupcakes. These cupcakes will make you want to head to the beach.

The cupcakes are full of coconut flavour. I used both coconut milk and shredded coconut in the cupcakes to really highlight the coconut flavours. Coconut pairs so well with different tropical fruits. I decided to go with a pineapple filling but I think mango would also work great with these cupcakes, if you're looking to do something a little different. 

Pina Colada Cupcakes - Coconut cupcakes filled with pineapple puree and topped with a rum buttercream

I decided to put together a video for you of me making these cupcakes. There a couple of steps to get to the final product but trust me they are worth it! The flavours batter, filling and frosting each come together to create the tropical pina colada flavour!  The recipe for the cupcakes, filling & frosting are below. Enjoy! 


Pina Colada Cupcakes

Coconut Cupcakes

Makes: 1 Dozen

Pineapple Puree Filling

Rum Buttercream Frosting

Assemble the Pina Colada Cupcakes

Pina Colada Cupcakes - Coconut Cupcakes filled with Pineapple puree and topped with a rum buttercream